
Emergency board-up is the unglamorous middle step of every storm-damage story: after the photos, before the adjuster, somebody has to put something over the hole. Do it right and you stop the water, satisfy your policy's mitigation requirement, and hand your insurer a clean before-and-after record. Do it wrong and you add a chewed-up stucco wall, a ladder injury, or a compromised claim to the storm's bill.
This guide covers the doing-it-right version, from materials to anchoring to the receipts that get you paid back. For where board-up fits in the larger post-storm sequence, start with our first-72-hours guide.
Why Your Policy Cares About This Step
Every Florida homeowners policy contains a version of the same clause: after a loss, the insured must take reasonable steps to protect the property from further damage. That clause cuts both ways.
In your favor: reasonable emergency measures are a covered part of the loss. The plywood, fasteners, tarps, and even a professional board-up service invoice are reimbursable when documented, which is why every receipt from this step goes in the claim file.
Against you if ignored: damage that accumulates because an opening sat uncovered for two weeks (the warped floors from rain band number three, the mold bloom in the wet drywall) invites the insurer to separate "storm damage" from "neglect damage" and pay only the former. The dollar difference can dwarf the cost of a sheet of plywood.
One boundary keeps the step safe on the other side: mitigation is not restoration. Cover the opening, dry the space, stop the bleeding. Do not commission permanent repairs, tear out walls, or sign replacement contracts before the adjuster has documented the scene; our claim guide covers that sequencing in detail.
Before Anything Goes Up: Document and Clear
Photograph the opening first. Inside and out, wide and close. Covering an undocumented opening converts evidence into a mystery, and uncovering it later for photos defeats the point. The full documentation protocol is in the 72-hours guide; the board-up rule is simply: no photo, no plywood.
Then clear the glass, carefully.
- Heavy gloves and eye protection are non-negotiable. Post-storm lacerations are an emergency-room staple, and they happen during cleanup more than during storms.
- Remove loose shards from the frame top-down. Leave firmly held glass in laminated units alone; cracked laminated glass (the kind in impact windows) holds together by design and can wait for the replacement crew.
- A shop vac handles fragments and slivers; a household vacuum turns them into shrapnel and a dead vacuum.
- Fold a moving blanket or towel over the sill before working through the opening. Sills hold invisible slivers.
Choosing the Covering: What Actually Works
| Opening | Best temporary covering | Notes |
|---|---|---|
| Standard windows | 5/8" exterior-grade plywood | The default. 1/2" flexes on larger spans; 3/4" is overkill to handle |
| Sliding glass doors | Reinforced poly tarp system, or plywood panels joined with battens | Spans usually exceed a single sheet; battened seams beat gapped sheets |
| French doors | Plywood over the damaged leaf; secure the operable hardware | Cover the glass area; do not screw doors shut in an occupied home's egress path |
| Picture/architectural glass | Shrink film or tarp + plywood on the accessible portion | Odd shapes resist boarding; weather-in what you cannot board |
| Second-story anything | A professional board-up service | Reimbursable like materials. Second-story sills sit 10-14 feet up; pro crews are legally required to rig fall protection at 6 feet, which tells you what the risk actually is |
Notes on the materials themselves: exterior-grade plywood (CDX is fine) survives rain bands; interior sheathing and OSB scraps delaminate in a week of August weather. Size the panel to overlap the opening by at least 4 inches on every side so fasteners land in solid wall, not in the broken frame. If plywood is sold out, which happens regionally after a landfall, layered reinforced tarps anchored on the same principles are a legitimate stopgap, and your receipt for the expensive tarp is as reimbursable as the plywood would have been. Price-gouging on emergency materials during a declared emergency is illegal in Florida, and reporting it to the Attorney General's price gouging hotline (1-866-9-NO-SCAM) is worth the two minutes.
Anchoring Without Wrecking the Wall
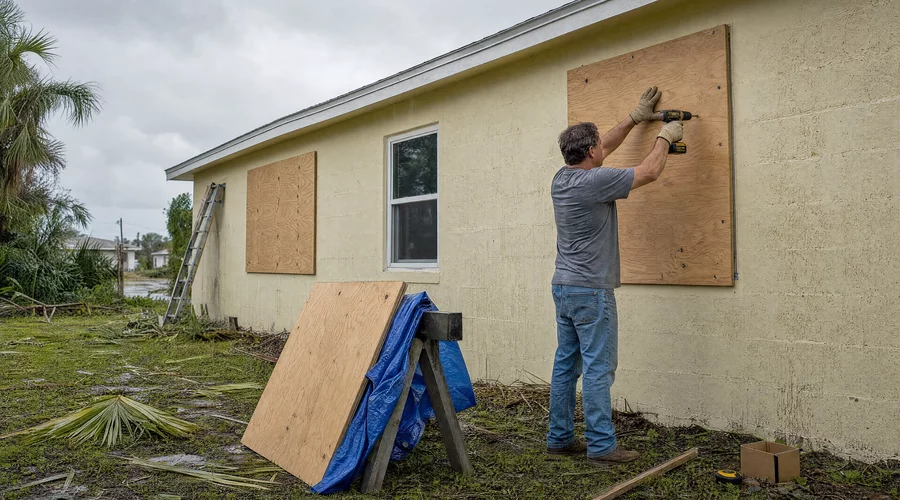
The most common board-up mistake in South Florida is treating a stucco-over-block wall like a wood-framed one. Stucco is a veneer; screws driven into it alone hold nothing and leave a constellation of patch points.
- Wood-framed walls: drive 2.5-3" exterior screws through the plywood into the structural framing around the opening (the studs and header, typically 1.5-2" back from the opening edge). Screws every 12-16" around the perimeter.
- Concrete block (most of South Florida): use masonry anchors (Tapcon-style) into the block or, better, anchor into the wooden buck framing the opening if your home has one. Three habits from professional install crews transfer directly: drill the pilot hole at least a quarter-inch deeper than the screw will reach, blow or vacuum the masonry dust out of the hole before driving (dust is why anchors spin instead of biting), and stop at snug — over-torquing strips the threads the anchor just cut and costs you the hold. Within a mile or so of salt water, stainless anchors are worth the few extra dollars even for a temporary job; standard coatings pit fast in salt air.
- The window frame itself is the last resort. If the frame is intact and the wall is inaccessible, screws into the frame work, but a frame slated for replacement anyway is the one place extra holes cost nothing; a frame you hope to salvage is not.
- Do not caulk or foam the plywood edges. You will be removing this in weeks; sealant turns removal into demolition. A tarp lapped over the top edge sheds water without adhesives.
Interior boarding is a fallback only for openings unreachable from outside: it leaves the frame cavity exposed to weather and marks the fix as visibly improvised, but it beats an open hole. If you must board from inside, lap a tarp over the exterior of the opening first when any safe access exists, so the wall cavity sheds water instead of drinking it, and note the compromise in your claim photos so the adjuster reads it as constraint rather than carelessness.
Behind the Board: Drying the Room Out
Covering the opening stops new water. The water already inside is on its own clock, and it is short: soaked drywall and carpet pad move from "dry it" to "cut it out" in roughly 48-72 hours in Florida humidity, which is why the drying step belongs in the board-up visit, not next weekend.
- Photograph the wet extent first, like everything else: waterlines on walls, soaked flooring edges, damp ceiling patches below the opening. Moisture readings from a $30 meter, photographed on the wall, are the kind of evidence adjusters accept without argument.
- Pull standing water and soaked soft goods the same day. Rugs, cushions, cardboard: out. Furniture up on foil or blocks. Carpet can often be saved; wet pad usually cannot, and pulling pad early is what saves the carpet above it.
- Move air aggressively. Fans across, not at, wet surfaces; the AC running (it dehumidifies); interior doors open. A rented or bought dehumidifier is a receipt-worthy mitigation expense in exactly the way plywood is.
- Open the wet wall's base if saturation is real: pulling baseboard and drilling weep holes at the bottom of soaked drywall ventilates the cavity. This is still mitigation, not demolition; leave the big cuts for after adjuster documentation unless mold pressure forces the issue.
- Know the handoff point. More than a room's worth of saturation, water that reached ceilings or wall cavities broadly, or any musty smell by day two is professional water-mitigation territory. Their invoice is a covered mitigation expense, and their moisture logs strengthen the claim rather than complicating it.
Everything here generates paper: meter photos, drying-equipment receipts, a mitigation company's report. It all rides with the claim, and it all defends you against the "that mold is from neglect" argument that surfaces when drying waits a week.
The Receipts File
Reimbursement runs on paper. One folder (physical or phone) holds:
- Materials receipts: plywood, fasteners, anchors, tarps, gloves, the drill bit that broke
- Service invoices: board-up company, handyman, the neighbor's teenager if you paid them, noted honestly
- Before-and-after photos of every covered opening, timestamped
- A one-line log of when each opening was covered
Submit these with the claim as mitigation expenses. They are usually paid without friction precisely because insurers prefer a $60 plywood receipt to a $6,000 mold remediation line. If a single receipt covers storm supplies and ordinary groceries from the same panicked store run, circle the mitigation items and note the split; adjusters process an annotated receipt in seconds and set an ambiguous one aside for questions.
When You Do Not Need to Board At All
Not every damaged opening needs plywood, and knowing the exceptions saves work and wall holes.
Cracked laminated glass that is holding is the big one. Impact windows are engineered to stay in the frame after breakage: the interlayer keeps the cracked unit weather-resistant and secure until replacement. A spiderwebbed impact unit that has not been breached needs photographs and a replacement order, not a board. Confirm what you have with our guide to identifying impact glass; the etched corner mark settles it in seconds.
Breached screens and shutters over intact glass need nothing urgent either: the protective layer failed, the envelope held. Document the damaged protection for the claim and re-shutter or repair on a normal schedule.
Hairline stress cracks in single panes that stay sealed can wait for glass service under tape and a photograph, weather permitting; boarding a sealed crack adds more damage risk (anchoring near cracked glass) than it removes.
The test in every case is the envelope: if wind and water cannot enter and the opening is not a security hole, mitigation is already satisfied and the board stays in the garage. When the envelope is open, board; when in doubt at height or over a large span, call a service.
What Board-Up Buys You, and What It Does Not
A proper board-up buys weeks: weather resistance through the remaining rain bands, security against the post-storm opportunist, and time to run the claim and replacement process without panic. It does not buy a season. Plywood is not rated opening protection, earns no insurance credit, fails unpredictably in a second storm, and turns a house dark in a Florida August.
The permanent decision comes with a code fact attached: replacement openings must meet current Florida Building Code, which in the Wind-Borne Debris Region means impact-rated units or shuttered protection; the storm that broke a 1998 slider also retired its like-for-like replacement. Between insurance proceeds, code requirements, and the lead times that stretch after every landfall, the efficient move is getting a measured replacement quote while the plywood is still fresh: a free estimate starts the manufacturing clock that the board-up bought you time for.
Next Steps
- Photograph every damaged opening now, before the hardware run.
- Board or tarp using the materials table above; anchor into structure, not stucco.
- Drop every receipt and photo into one claim folder, then file per the claim guide.
- Vet anyone offering board-up or repair at your door against the scam field guide first.
- Get a free estimate for code-compliant replacement while boarded, so the plywood weeks count against the manufacturing lead time, and check financing options if the deductible left the budget tight.