


Why It Matters
Knowing whether your windows are impact-rated affects three things directly:
Your safety. Standard windows shatter from wind-borne debris during hurricanes, triggering the envelope breach cascade (30-60 PSF internal pressure + 40-80 PSF roof suction = 70-140 PSF of uplift) that destroys homes. Impact windows crack but hold, keeping the envelope sealed.
Your insurance. The opening-protection credit on the wind mitigation form (30-45% of your wind premium) requires that ALL openings be protected with impact-rated products or approved shutters. If your windows aren't impact, you're leaving $1,000-$3,500 per year on the table in South Florida.
Your code compliance. If you're in the HVHZ (Miami-Dade, Broward) or the Wind-Borne Debris Region and you're planning window replacements, knowing which windows are already impact-rated helps you plan the project scope and avoid triggering the 25% rule unnecessarily.
Here are five methods to check, from most reliable to least.
Method 1: The Glass Bug Label (Most Reliable Visual Check)
Every certified impact window has a permanent marking etched, stamped, or sandblasted into the glass, usually in the bottom corner of one of the panes. This is called the "bug label" or "bug stamp" in the industry.
What to look for:
The bug label is small (typically 1-2 inches) and may be hard to see without close inspection. It contains:
- Manufacturer name or logo (PGT, ES Windows, CGI, ECO, etc.)
- Product line (WinGuard, Elite, Sentinel, etc.)
- Testing standard reference: This is the key indicator.
- ASTM E1886 or ASTM E1996 = impact-rated for the Wind-Borne Debris Region
- TAS 201 / TAS 202 / TAS 203 = impact-rated for the HVHZ
- CPSC 16 CFR 1201 = safety glass only (NOT impact-rated for hurricanes)
- ANSI Z97.1 = safety glass only (NOT impact-rated)
- SGCC (Safety Glazing Certification Council) logo or certification number
How to find it: Look at all four corners of the glass on both the interior and exterior side. The label is permanently embedded in the glass and cannot be removed by cleaning or painting. If you see it, the glass is certified. If the only markings reference CPSC 16 CFR 1201 or ANSI Z97.1 without ASTM E1886/E1996 or TAS references, the glass is safety-rated but NOT hurricane impact-rated.
Caveat: Very old impact windows (pre-2005) may have less standardized labeling. The absence of a visible bug label doesn't definitively prove the glass is non-impact; it may have worn or been obscured. Use the other methods to confirm.
Method 2: The Frame Label
In addition to the glass marking, impact windows have a product label on the frame, usually along the bottom rail, side rail, or head of the frame. This label is often a sticker or printed tag (not permanent like the glass bug label).
What to look for:
- Florida Product Approval (FL) number: A numeric identifier (e.g., FL-12345) that can be looked up at the Florida Product Approval System
- Miami-Dade NOA number: A separate identifier for HVHZ-approved products, verifiable at Miami-Dade Product Control
- Manufacturer, model, and series information
- Design pressure (DP) rating
- Date of manufacture
How to verify: Enter the FL number or NOA number in the respective online database. The search result will show whether the product is impact-rated, what testing standard it met, and what design pressures it's certified for.
Caveat: Frame labels are stickers and can be removed, painted over, or deteriorated over time. If the label is missing, it doesn't mean the window isn't impact; it means you need another method to verify. Important: Do NOT remove frame labels before a building inspection or wind mitigation inspection. Inspectors use these labels to verify the products.
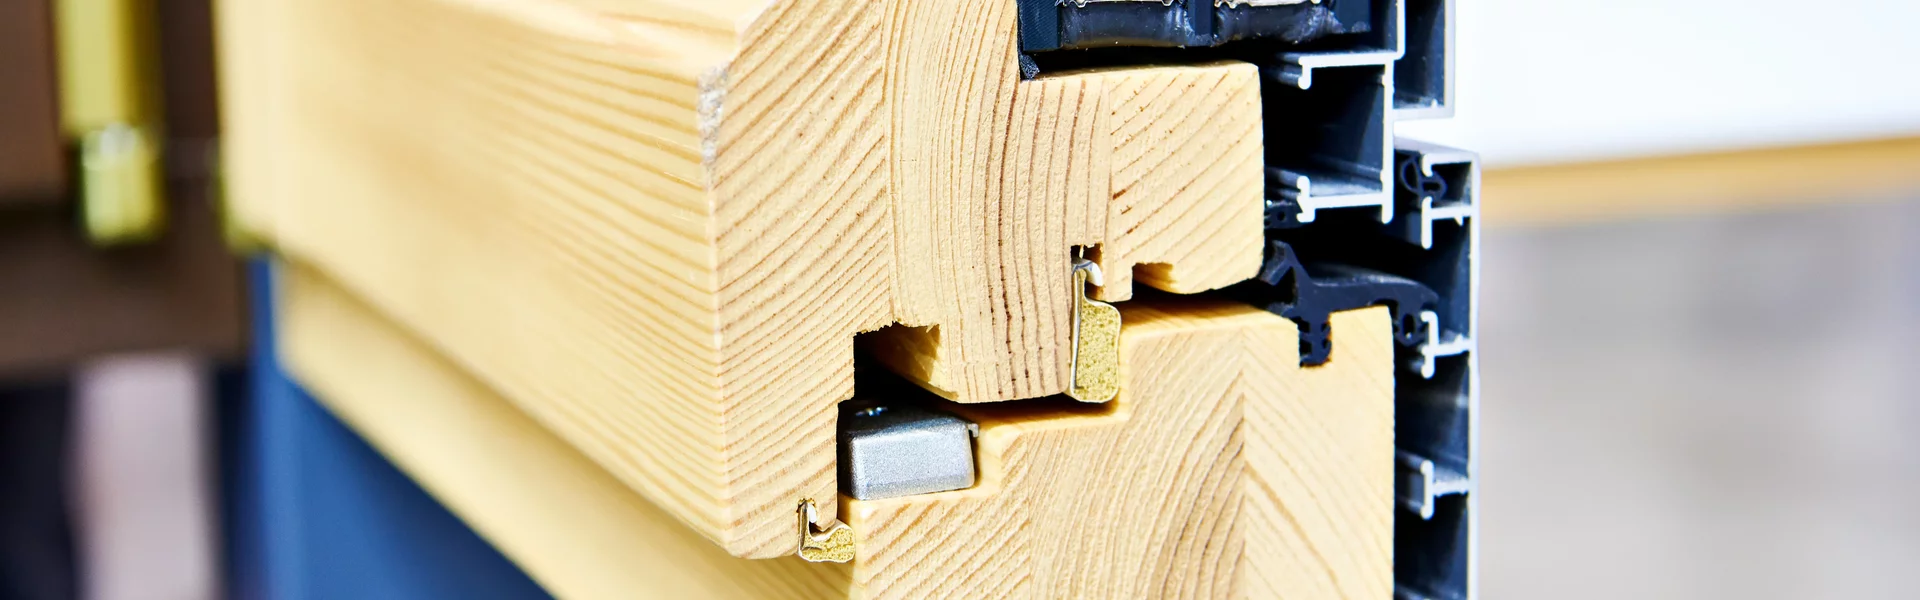
Method 3: The Interlayer Inspection
Impact glass is laminated: two sheets of glass bonded to a polymer interlayer (PVB or SentryGlas). Standard glass is either a single pane or a double-pane insulated glass unit (IGU) with an air gap between the panes but no interlayer.
How to check:
- Stand at the edge of the glass (the side, not the face)
- Tilt your head so you're looking along the edge of the glass at a shallow angle
- Look for the layers within the glass cross-section
What you'll see in impact glass:
- Two distinct glass panes with a slightly milky, clear, or yellowish interlayer bonded between them
- The interlayer is visible as a thin line (approximately 0.090 inches / 2.3mm for standard PVB) between the glass sheets
- In an impact IGU (insulated impact glass), you'll see: outer glass + interlayer + inner glass + air gap + another glass pane (the thermal pane)
What you'll see in non-impact glass:
- A single pane (one glass sheet, no interlayer)
- A standard IGU: two panes separated by an air gap with a spacer bar visible around the perimeter, but NO interlayer bonded between any of the panes
The key distinction: An air gap between panes (with a spacer bar) is an insulated glass unit for thermal performance. An interlayer bonded directly to the glass (no air gap between those two specific panes) is laminated impact glass. Impact IGUs have both: a laminated pair (with interlayer) plus a separate pane with an air gap.
Caveat: This method requires careful observation and good lighting. In some products, the interlayer is nearly invisible (especially SentryGlas ionoplast, which is clearer than PVB). If you're unsure, use other methods to confirm.
Method 4: The Tap Test (Supplemental Only)
Impact laminated glass sounds different from standard glass when tapped with a knuckle or a coin.
Standard glass: Produces a higher-pitched, ringing sound. The single pane vibrates freely.
Impact laminated glass: Produces a lower-pitched, more solid, damped sound. The interlayer absorbs vibration energy, preventing the sharp ring that standard glass produces.
How to do it: Tap the glass lightly with your knuckle in the center of the pane. Listen for the tone and how quickly it dampens. Then tap a window you know is standard glass (interior glass, mirror, picture frame) for comparison.
Caveat: This is the least reliable method. It can suggest impact glass but cannot confirm it definitively. Double-pane IGUs (even non-impact) also sound different from single-pane glass. Use this as a supporting indicator alongside other methods, not as standalone confirmation.
Method 5: Permit Records (Most Definitive If Labels Are Missing)
If visual inspection is inconclusive (labels missing, interlayer unclear, uncertain tap test), the most definitive method is to check the building permit records for your property.
How to do it:
- Contact your city or county building department (most Florida jurisdictions have online permit search portals)
- Search by your property address
- Look for window or door replacement permits
- The permit application will document the specific products installed, including manufacturer, model, Florida Product Approval number or Miami-Dade NOA, and design pressure ratings
This tells you definitively what was installed, when, and whether it met impact requirements.
Useful for:
- Homebuyers verifying what a previous owner installed
- Homeowners who purchased a home with existing impact windows but have no documentation
- Verifying whether work was done with proper permits (unpermitted window installations are a red flag regardless of product quality)
Limitation: If the previous owner installed impact windows without a permit (illegal but it happens), there will be no permit record. In this case, the glass bug label and frame label are your best evidence.
What If Only Some Windows Are Impact?
This is common. A previous owner may have installed impact windows on the front of the house or the most visible openings but left bedrooms, bathrooms, or secondary windows as standard glass.
What this means for insurance:
The wind mitigation opening-protection credit is essentially all-or-nothing. All openings (every window, every door, every skylight, the garage door) must be protected to qualify for the maximum credit (30-45% of wind premium). Partial protection gets you reduced credit (Level B) or, with some insurers, no credit at all.
If you have 12 impact windows and 3 non-impact windows, your home is classified at the level of the weakest opening. Those 3 non-impact windows could be costing you $1,000-$3,500 per year in missed insurance savings.
What to do:
- Option 1: Replace the remaining non-impact windows with impact windows to complete the package. This is the highest-value option because it unlocks the full insurance credit.
- Option 2: Install hurricane shutters (accordion at $300-$700 per window, or storm panels at $150-$350) over the non-impact windows. Both qualify for the credit when all openings are covered, and they're much less expensive than replacing the windows.
- Option 3: Install hurricane screens ($200-$500 per window) over the non-impact windows. Verify Florida Product Approval before purchasing.
The cheapest path to the full insurance credit is often covering the remaining unprotected openings with storm panels ($150-$350 each) rather than replacing windows ($1,000-$3,000 each).
What If Your Windows Are NOT Impact?
If none of your windows are impact-rated, you have the full range of options:
Impact windows ($1,000-$3,000 per window, $15,000-$65,000 whole home): Permanent, always-on protection with daily benefits.
Hurricane shutters ($150-$1,500 per window depending on type, $2,000-$25,000 whole home): Lower cost, requires deployment.
Hybrid approach: Impact windows on primary openings, shutters on secondary. Captures the best value from each.
My Safe Florida Home: Grants up to $10,000 for qualifying homeowners. PACE financing provides $0 down with no credit check.
Start with a free estimate to understand the cost for your specific home and openings.
What to Tell Your Home Inspector or Real Estate Agent
If you're buying a Florida home, ask the home inspector to specifically verify:
- Are the windows impact-rated? (Check glass bug labels and frame labels)
- Do they cover ALL openings? (Including garage door, skylights, and secondary windows)
- Are there permits on file for the window installation?
- Is the wind mitigation inspection current? (Valid for 5 years)
- What is the insurance premium with and without the wind mitigation credits? (This directly affects your monthly cost of ownership)
A home with full impact protection and a current wind mitigation form is worth more than a comparable home without, and the insurance savings can be $1,000-$3,500 per year. Factor this into your purchase negotiation.
Next Steps
- Walk your home and check every window using Methods 1-3 above. Note which are impact and which aren't.
- If all windows are impact, get a wind mitigation inspection to document them and claim your insurance discounts.
- If some windows are not impact, get a free estimate for the most cost-effective way to complete the protection (often shutters on the remaining openings rather than full replacement).
- If no windows are impact, see our how to protect your windows guide for all 9 options ranked by cost and convenience.
- Check MSFH eligibility for grants up to $10,000 toward impact windows or shutters.